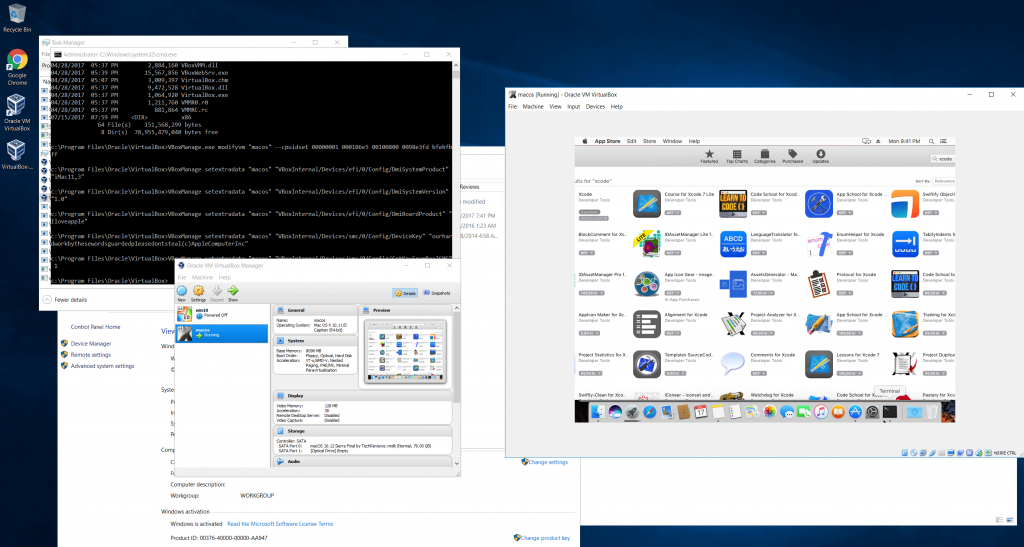
Last week Microsoft finally released their new Azure Virtual Machine series Dv3 and Ev3, besides being based on the latest Intel hardware, these machine are also running Windows Server 2016 as the host OS which supports nested virtualization. Why is that interesting you might ask? Well, it is interesting because now it is possible to run hyper visors inside an Azure VM. To me as a developer that is pretty cool, because now I can actually create a development machine in the cloud, install hyper-v on it and run my mobile emulators or even use docker for Windows, which is dependent on Hyper-V. Furthermore, as I’m going to show in this blog post, I can also install an open source Hypervisor like VirtualBox and use that to emulate a Mac, of course that can also be done on a local machine, but the benefit of running it in the cloud is that it can be online 24×7 which is great if you need a build or test server. (Beware that Apple licensing is probably not going to approve of this, but let’s save that concern for another day).
So what do you need:
- You need 1 Azure VM based on Ev3 or Dv3, for my testing I used a Standard_E2_v3 hosted in West Europe (Currently the new machine are only in West US2, East US2, Southeast Asia and West Europe). I just picked Windows Data Center 2016 and installed everything from the azure portal. No ARM templates for my testing purpose.
- Once the machine is provisioned, you need VirtualBox. You can download that from https://www.virtualbox.org/wiki/Downloads. For some reason it downloaded super slow from Azure, so I downloaded i on my local machine and uploaded it through remote desktop.
- With VirtualBox installed it is time, to install the operation system of your choice on your nested virtual machine. As I promised I’m going to install MacOS Sierra. Luckily, some more Apple Savy people have described how to do, the guide I followed are https://techsviewer.com/install-macos-sierra-virtualbox-windows. Basically the guide boils down to download a base image, then setup a VM in virtual box and do a few tweaks to it, to trick MacOS into thinking it is running on a Mac, and the boot the machine.
- You can download the image from https://goo.gl/OKgCeH
- When you create your new VM from the downloaded image select MacOS as type, and El Captain 64bit as the Version

- The commands you are required to run using VBoxManage (which is found in
C:\Program Files\Oracle\VirtualBox) are
VBoxManage.exe modifyvm "macos" --cpuidset 00000001 000106e5 00100800 0098e3fd bfebfbff

VBoxManage setextradata "macos" "VBoxInternal/Devices/efi/0/Config/DmiSystemProduct" "iMac11,3"

VBoxManage setextradata "macos" "VBoxInternal/Devices/efi/0/Config/DmiSystemVersion" "1.0"

VBoxManage setextradata "macos" "VBoxInternal/Devices/efi/0/Config/DmiBoardProduct" "Iloveapple"

VBoxManage setextradata "macos" "VBoxInternal/Devices/smc/0/Config/DeviceKey" "ourhardworkbythesewordsguardedpleasedontsteal(c)AppleComputerInc"

VBoxManage setextradata "macos" "VBoxInternal/Devices/smc/0/Config/GetKeyFromRealSMC" 1
Replace"macos"with the name of the virtual machine you created. - Before you try to boot the machine be sure to increase the Video memory of the VM 128 MB, it will not boot with less.
This is all it takes to get MacOS up and running on Azure using nested virtualization and Virtual Box. If you are planning to do a lot of work on MacOS, I can recommend using a machine with SSD. Also note that the image linked to is not the latest version of Sierra, so you will have to run an update after the installation. If someone can point me to a public downloadable image of a more recent version please let me know in the comments.
