Last year I posted an article about how to use LightSwitch to display data from Microsoft Dynamics CRM. A handfull of people commented on that article and asked how to do the same with Microsoft Dynamics CRM Online. I have had a idea on how to do that for a while, but as it was not very user friendly I have been neglecting to post it. Secretly I was hoping that Microsoft would provide the same sort of integration between Dynamics CRM and LightSwitch as they have done with SharePoint online, but that does not seem to happen. So I have decided to share my solution.
Overview of Solution
The solution consists of the following parts.
- Standard LightSwitch Visual Studio project with an OData connection to CRM online
- An anonymous CRM Online OData service host
- Extensions to Office 365 API tools, to enable support for CRM online
My goal with the solution is to be able to use the standard LightSwitch interface to connect to CRM online’s OData Service endpoint. Unfortunately that is not possible without work-arounds as CRM Online does not use any of the authentication types that LightSwitch support for OData.
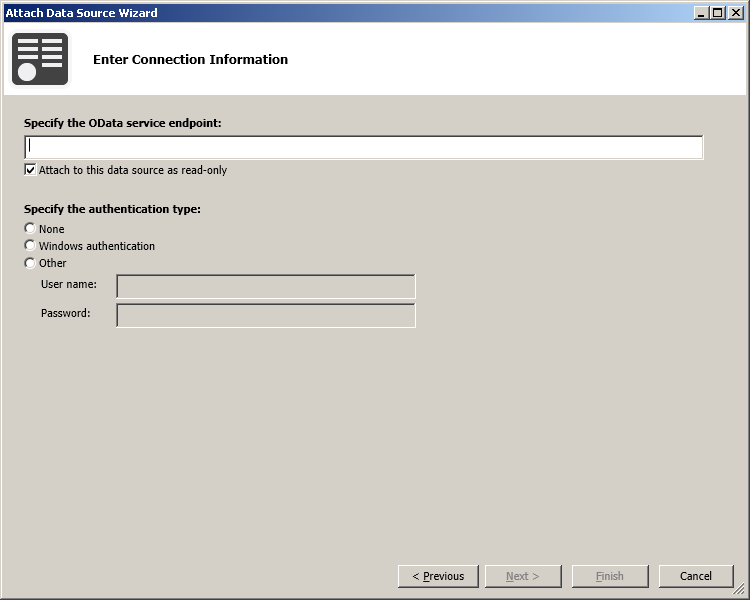
In theory there’s a fourth type, namely SharePoint authentication, based on an OAuth2 flow, but for that the LightSwitch team decided to build a Data Source extension, that leads you through a special wizard when you connect to SharePoint data, so that is not useful for connecting to anything else than SharePoint. In the perfect world I would build a data source extension for CRM, by copying most of the code from the SharePoint data source extension, but that is a big task that I don’t have time for right now. So my solution is a bit more difficult to get started with, but will yield the same results.
Prerequisists
Before you get started, here’s a list of prerequisits
- Visual Studio 2013 (I’m using Premium with RC3 but Professional should work too).
- Office 365 API Tools Extension for Visual Studio Installed
- Microsoft Dynamics CRM Online Subscription
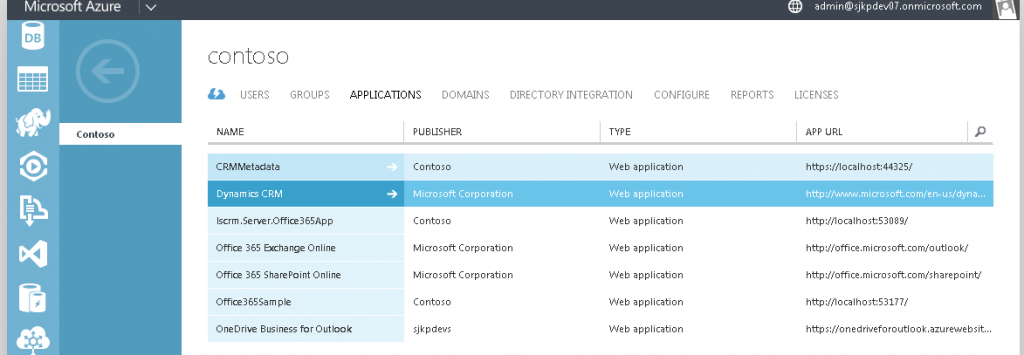
- Azure Subscription connected to your CRM online subcription, in other words you should be able to see Dynamics CRM from Microsoft Corporation in your Azure Active Directory Application listing.
Creating a LigthSwitch data source from CRM online data
The first step is to create a data source in your LightSwitch project that lets you access the CRM Online data you want to include in your project. As every CRM installation potentially have different entities, we need a way for LightSwitch’s OData Service Data Source to connect to the CRM Online REST endpoint for your CRM tenant to get the correct metadata descriping the REST endpoint. As mentioned this is not directly possible because of the authentication protocol used by CRM online.
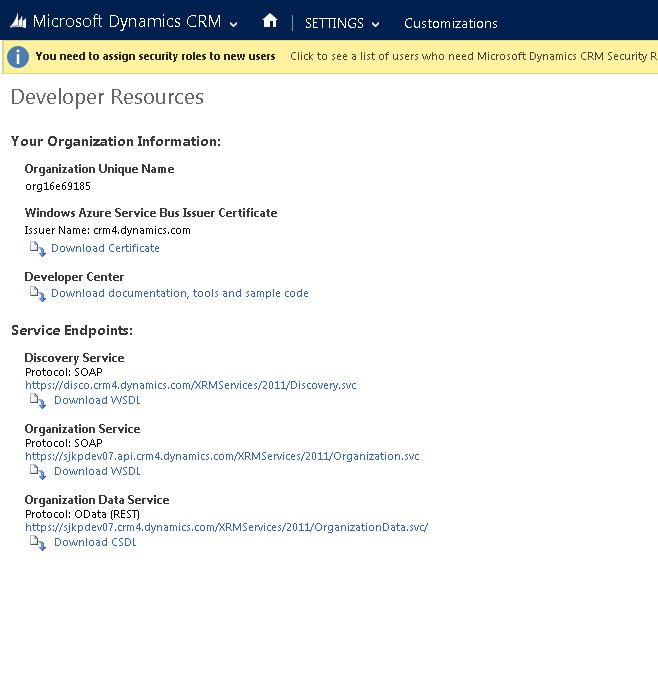
What we need is an anonymously accessible service that can host the REST metadata describing your CRM tenant’s entities, so we can connect to it from LightSwitch (we only need to connect to it anonymously while we build the LightSwitch data model). You can build such service yourself by hosting the XML returned by the following url somewhere where it can be accessed without the need to login. The URLs used for hosting the metadata should be one base url, and one /$metadata.
https://
https://
You find your URLs in the Administration > Customizations > Developer Resources in CRM.
 .
.
In order to save time I have setup a web service, that automates this process. All it requires is that a user that have access to your organization’s REST endpoint login to the web service which then creates a temporary (20 minutes) anonymous accessible REST metadata endpoint that can be used to build the data model in LightSwitch.
With the anonymous accessible url to your Dynamics CRM Online instances metadata, we can start building our LightSwitch project.
Walkthrough for Building a LightSwitch Project with CRM Online Data
Adding CRM entities to the Data Model
- Create a new LightSwitch HTML Application (with C#), I named mine “LightSwitchCRMOnlineDemo”
- Go to my CRM Online Metadata service, and generate a new anonymous accessible endpoint, by typing in your tenant name, my tenant is named
sjkpdev07 - Once generated you get an url, I got
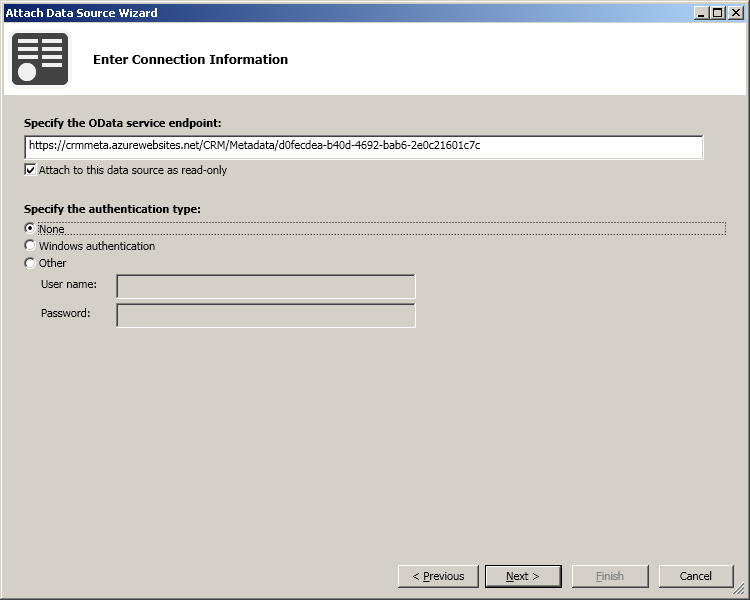
https://crmmeta.azurewebsites.net/CRM/Metadata/d0fecdea-b40d-4692-bab6-2e0c21601c7c - From Visual Studio in your LightSwitch project click “Attach to external Data Source” and Select “OData Service” click next
- In the new dialog, paste the Url generate and select “None” under authentication, click next
- Now Visual Studio will download the metadata from the endpoint and you will be able to select your CRM entities. I just selected “Account”, kept the default name for the data source “sjkpdev07ContextData” and clicked finish
- Now you have completed building the LightSwitch data model for your CRM entities, if you need to change it or add new entities the process is the same.
Configuring Access for CRM Online Data
All you have done now is to import a model of how your data in CRM online looks, the next step is to setup authentication so you can actually access your data, this is where things get a little complicated.
I order to avoid doing a lot of manual configuration, we are usign the Office 365 API tools to configure our project for accessing Office 365 Data (I don’t know if CRM Online technically is considered part of Office 365, but you can authenticate to it the same way you do to SharePoint, so the tool is a great help).
- Right click your Server project, and under “Add click “Connected Services”.
- Click Register your app and login with your Azure AD administrator credentials
- Depending on what resources you have connected to your Azure AD subscription, you will see a different list than I do, I have Exchange and SharePoint online, in addition to CRM online.
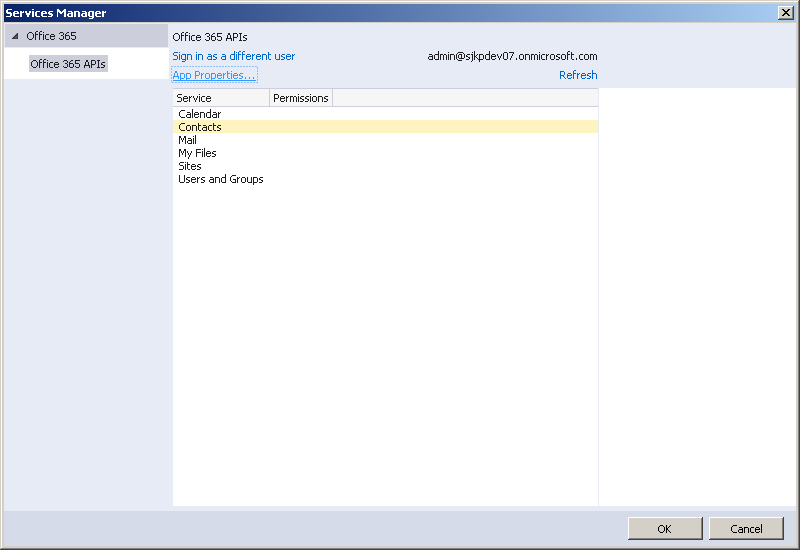
But don’t worry we will not use anything else from the wizard, so you can just click “Ok” without selecting anything. What the wizard have done for us so far it that it created an Application in Azure AD, and added configuration for that Application to the web.config. - Because we didn’t add anything from the wizard we are missing some assembly references that we have to add. So install the following nuget package
Install-Package Microsoft.Office365.OAuth.AspNet -Prereleaseremember the -Prerelease switch as the Office 365 API tools are not released yet. - Now it’s time to head into the Windows Azure Portal and manage the newly added AD application. My application is named
LightSwitchCRMOnlineDemo.Server.Office365App. Scroll to the bottom of the configure page, and find the section permissions to other applications. When justed added you should see the following here:

We don’t need that permission instead we need permission to access Dynamics CRM, so change the permissions so they look like this, and hit save

- We also need to change the connectionString, as LightSwitch automatically populated it with the url to the metadata service. Since that service have no access to CRM data we need to update the connection string to point to the CRM instance. In the web.config, find connectionString and change it to look something like this
[xml]
<connectionStrings>
<add name="_IntrinsicData" connectionString="Data Source=|SqlExpressInstanceName|;AttachDbFilename=|ApplicationDatabasePath|;Integrated Security=True;Connect Timeout=30;MultipleActiveResultSets=True" />
<add name="fda05e18-9007-4c47-9911-54aa842a7cb7" connectionString="Service Url=https://sjkpdev07.crm4.dynamics.com/XRMServices/2011/OrganizationData.svc;Is Windows Authentication=False;Allow Invalid Certificate=False" />
</connectionStrings>
[/xml]
Your “name” which is autogenerated by LightSwitch and “Url” should obviously look different than mine. - Another small, but important thing is that for authentication to work, we must run over HTTPS so in the properties of the server project, you should set SSL Enabled to true. After you have done, that you should go to the “Connected Service” dialog again as it will then update the redirect endpoint registered with the Azure AD app for you.
- Now we have all the configuration in place, next we need to write some code that will allow us access the data in CRM Online as an authenticated user.
Authenticate with CRM Online and Accessing Data
Finally, we need is to use the Windows Azure AD application to fetch an access token we can send along the requests to CRM Online, so we can get access to CRM data as an authenticated user.
For that I have created some very simple classes, that you can use as a starting point. To follow the last part of the guide you need to add both classes to your LightSwitch server project.
CRMClient
[csharp]
using System;
using System.Threading.Tasks;
namespace LightSwitchApplication
{
/// <summary>
/// Class mimicing the other Clients of the Office 365 API tools set for accessing CRM online data.
/// </summary>
class CRMClient
{
private Func<Task<string>> _accessTokenGetter;
private object _syncLock = new object();
private string _accessToken;
private Uri _serviceRoot;
public CRMClient(Uri serviceRoot, System.Func<Task<string>> accessTokenGetter)
{
_accessTokenGetter = accessTokenGetter;
_serviceRoot = serviceRoot;
}
private async Task SetToken()
{
string token = await this._accessTokenGetter();
lock (this._syncLock)
this._accessToken = token;
}
public async Task<string> GetAccessToken()
{
await SetToken();
return _accessToken;
}
}
}
[/csharp]
CRMSample
Be sure to change the ServiceEndpointUri to match the Url of your CRM enviroment
[csharp]
using System;
using System.Threading.Tasks;
using Microsoft.Office365.OAuth;
namespace LightSwitchApplication
{
/// <summary>
/// CRMSample class showing how to connect to CRM online by using the Office 365 API tools to get access token.
/// </summary>
public class CRMSample
{
DiscoveryContext _discoveryContext;
private static Uri ServiceEndpointUri = new Uri(
"https://sjkpdev07.crm4.dynamics.com/XRMServices/2011/OrganizationData.svc/");
private static string ServiceResourceId = "Microsoft.CRM";
public async Task<string> GetAccessToken()
{
var client = await EnsureClientCreated();
return await client.GetAccessToken();
}
private async Task<CRMClient> EnsureClientCreated()
{
if (_discoveryContext == null)
{
_discoveryContext = await DiscoveryContext.CreateAsync();
}
var dcr = await _discoveryContext.DiscoverResourceAsync(ServiceResourceId);
var user = dcr.UserId;
return new CRMClient(ServiceEndpointUri, async () =>
{
var accesToken = (await _discoveryContext.AuthenticationContext.AcquireTokenByRefreshTokenAsync(new SessionCache().Read("RefreshToken"), new Microsoft.IdentityModel.Clients.ActiveDirectory.ClientCredential(_discoveryContext.AppIdentity.ClientId, _discoveryContext.AppIdentity.ClientSecret), ServiceResourceId)).AccessToken;
return accesToken;
});
}
}
}
[/csharp]
With these two classes added we need to setup LightSwitch to authenticate the user and grab an access token, that can be sent along with all requests to CRM.
- For simplicity of this blog post, we authenticate the user only on the default.aspx page. To do so we first need to change the page directive to allow async programmering to be used. Open “default.aspx” and chagne the first line to look this this.
[csharp]
<%@ Page Language="C#" CodeBehind="default.aspx.cs" Inherits="LightSwitchApplication._Default" Async="true" %>
[/csharp] - Next we update the code behind to use our CRMSample class to get an access token for the current user. If the user is not signed into CRM they will be redirect to do so when they hit the page. The code we need to added to “default.aspx.cs” is:
[csharp]
public partial class _Default : Microsoft.LightSwitch.Framework.Server.DefaultPageBase
{
protected override async void Page_Load(object sender, EventArgs e)
{
try
{
var task = await new CRMSample().GetAccessToken();
basePageLoad();
}
catch (RedirectRequiredException ex)
{
Response.Redirect(ex.RedirectUri.ToString(), false);
}
}private void basePageLoad()
{
string url;
string defaultClientName = ConfigurationManager.AppSettings["Microsoft.LightSwitch.DefaultClientName"];
if (defaultClientName != null)
{
url = string.Format("./{0}/{1}{2}", (object)defaultClientName,
(object)LightSwitchAuthenticationConfiguration.ClientLaunchPageName,
(object)this.Request.Url.Query);
}
else
{
url = (string)null;
this.Response.StatusCode = 500;
this.Response.End();
}this.Response.Redirect(url, false);
}
}
[/csharp]
You need to add a reference to “System.Configuration” to the project to be able to use theConfigurationManagerclass. Also you need to add the following using statements
[csharp]
using Microsoft.LightSwitch.Utilities.Server.Internal;
using Microsoft.Office365.OAuth;
[/csharp] - The reason why we need to do this in the “default.aspx” page is that it’s the only place in a LightSwitch application that we actually can write some server side code, as all the other places are html pages or REST calls, called from javascript that don’t do well with the client side redirects needed to login the user. I am working an Authentication HttpModule that will do this, but it’s not ready to be published yet, and I wanted to show the concepts rather than the perfect implementation.
- The final thing we need to do, is to add the access token to all outbound requests that are sent from the LightSwitch application to CRM Online. The best place I have found to do that, is in a partial class to the data context class that was autogenerated by LightSwitch when you made the CRM model. My partial class looks like this
[csharp]
using System.Data.Services.Client;
using LightSwitchApplication;namespace sjkpdev07ContextData.sjkpdev07ContextDataService
{
public partial class sjkpdev07Context : global::System.Data.Services.Client.DataServiceContext
{
partial void OnContextCreated()
{
this.SendingRequest2 += OnSendingRequest2;
}private void OnSendingRequest2(object sender, SendingRequest2EventArgs sendingRequest2EventArgs)
{
var token = new SessionCache().Read("AccessToken#Microsoft.CRM");
sendingRequest2EventArgs.RequestMessage.SetHeader("Authorization", "Bearer " + token);}
}
}
[/csharp]
A few things to note here.- This won’t build unless you include the folder “GeneratedArtifacts” that LightSwitch have created for your DataSource in your project.
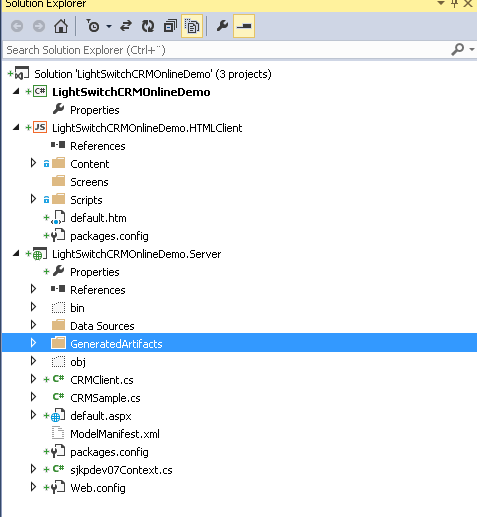
- The namespace must match that of the autogenerated DataServiceReference file, in my case it’s named “sjkpdev07ContextDataServiceReference.cs”.
- This code is not that robust, if the user have never visited the default.aspx and got an access token that way, this code will not be able to get it.
- This won’t build unless you include the folder “GeneratedArtifacts” that LightSwitch have created for your DataSource in your project.
All that is left to do now, is to add a view that show the Account data from CRM so there is something to show the user. I will not go into details on how to do that, but I will just show few screenshots of the final result.
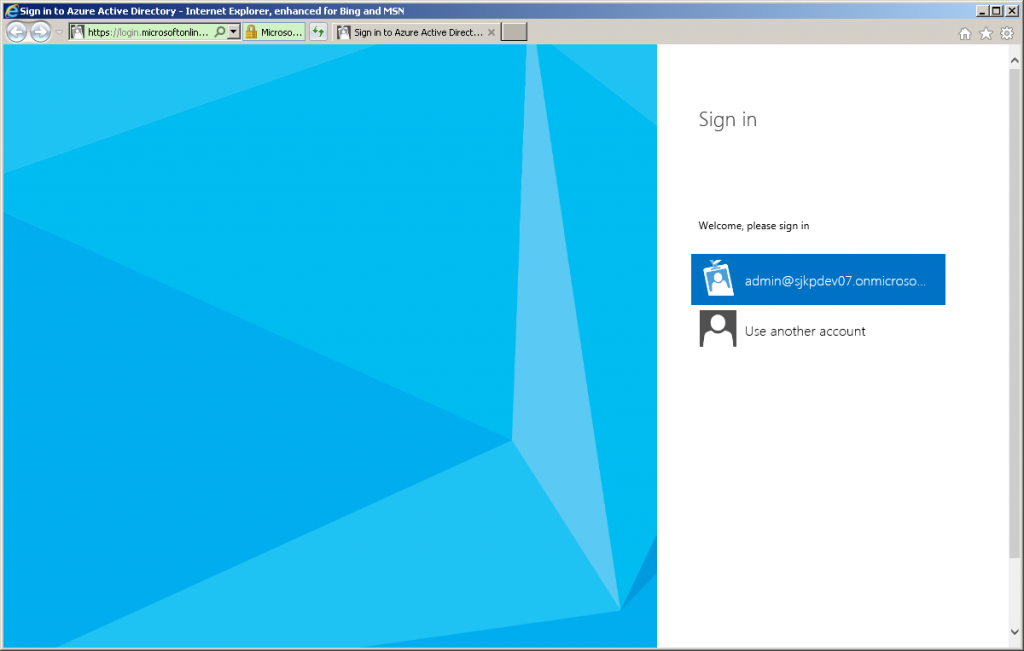
When https//localhost:44327/default.aspx is accessed for the first time the user is instantly redirected to Azure to sign in.
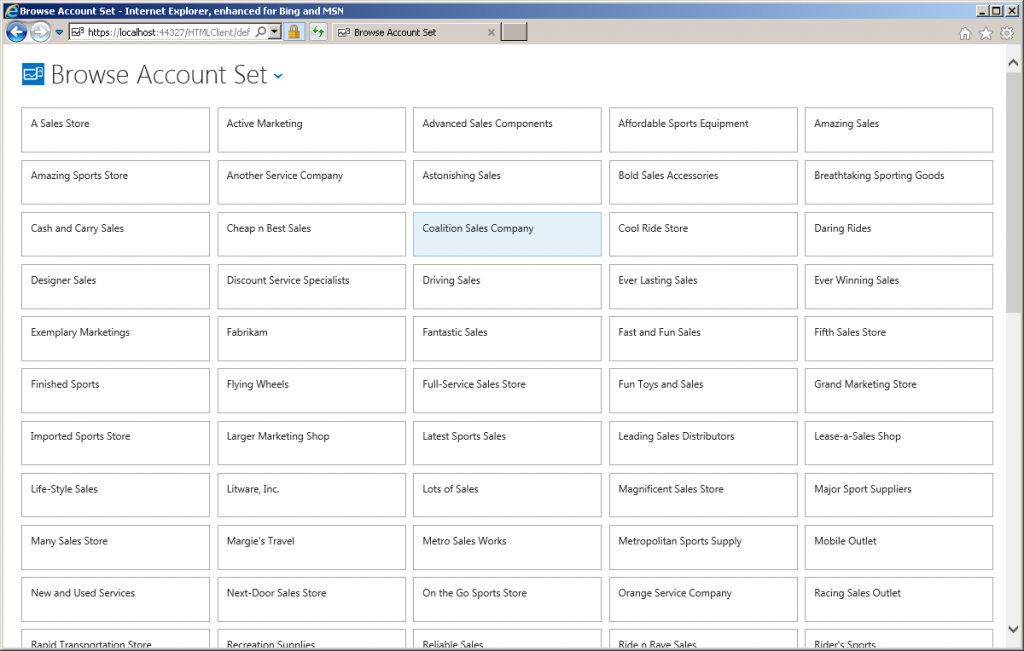
After sign-in the user can see an overview of accounts in CRM Online.
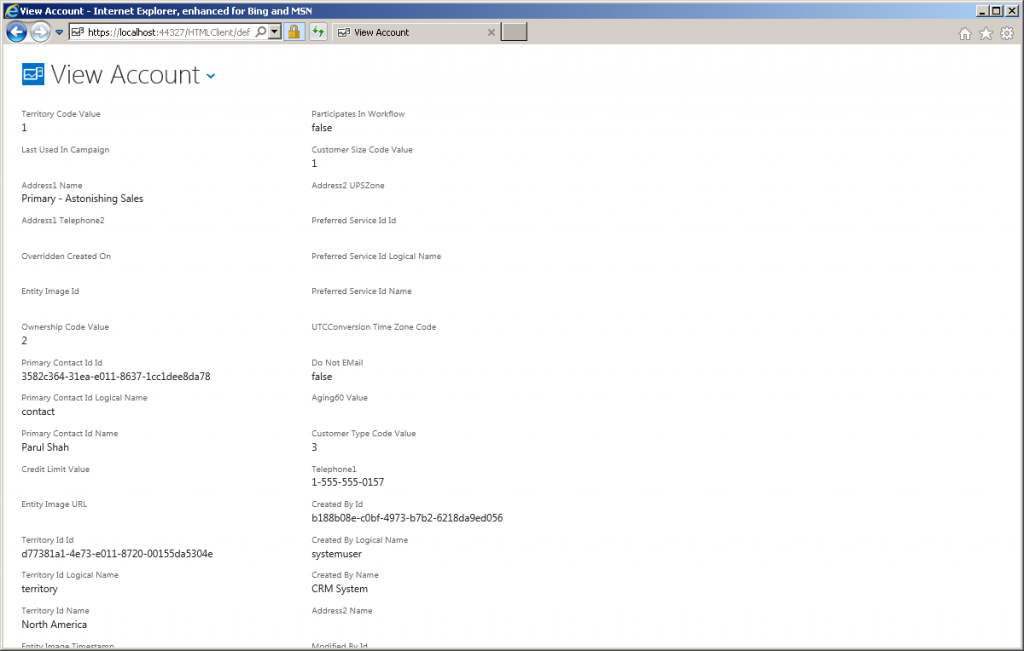
If an account is opened then all account details are visible.
Remember that you have to access the appilcation on https and /default.aspx before you try to access your views, otherwise the Access Token will not be in the cache.
I have uploaded my code for this tutorial to my github @ https://github.com/sjkp/LightSwitchCRMOnlineDemo, remember that this code won’t run for you as you don’t have access to my CRM tenant, but in case you want to see the complete solution I hope it can be helpful.